


Thursday 26 May 2011
how to block a website
Block A Website Using Window
This trick will be helpful for those who want to block access to particular websites on their system. Parents can block certain websites from their younger ones. It can also be used in schools and colleges etc….
By Following Simple Step You will to Block a Website using Window
Try it .
Comment and Share .
This trick will be helpful for those who want to block access to particular websites on their system. Parents can block certain websites from their younger ones. It can also be used in schools and colleges etc….
By Following Simple Step You will to Block a Website using Window
1. Open MyComputer
2. Browse C: (or your Operating system drive)
3. Browse Windows –>System32–>drivers–>etc
so the Location will be C:\WINDOWS\system32\drivers\etc
In the etc folder look for the file hosts
4. Open this file hosts with notepad.
5. Locate the line 127.0.0.1 localhost
6. To block www.google.com for example, just add this text under
127.0.0.1 localhost:
127.0.0.1 www.google.com
127.0.0.1 www.yahoo.com
127.0.0.1 www.google.com
127.0.0.1 www.yahoo.com
7. Save the file.
In this way add any number of sites you want, however you will need to prefix it with “127.0.0.1″.
Note: This blocks the website from opening in any browser whether it is Mozilla Firefox or Internet Explorer
Try it .
Comment and Share .
How to get ownership for any changes in window7
Taking ownership of system files or folders in Windows 7 or Vista is not a simple task. Whether you use the GUI or the command line, it takes far too many steps.But a registry file hack that will give you a menu item for “Take Ownership” that will handle all the steps for you.
Here’s what the new right-click menu will look like after installing this registry hack.


Here’s what the new right-click menu will look like after installing this registry hack.
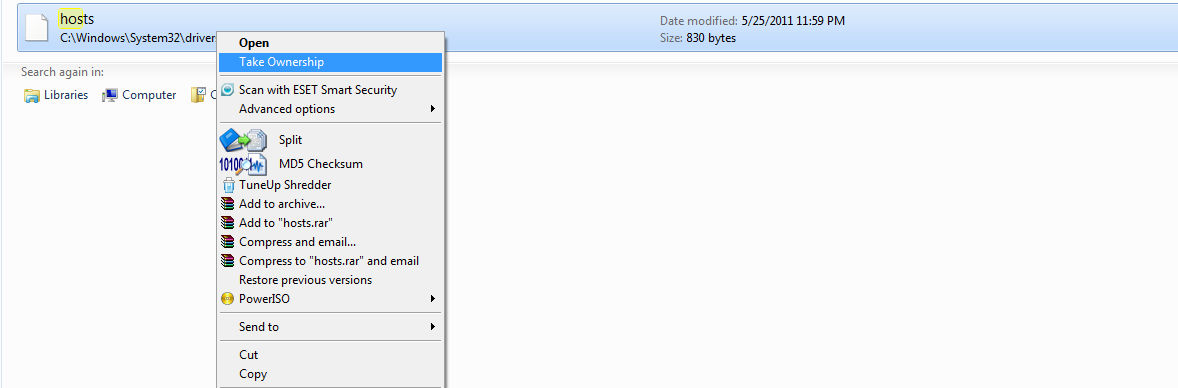
Install
Download and unzip the files contained in the zipfile. Double-click the InstallTakeOwnership.reg file and click through the prompts. No reboot necessary.

Uninstall
Double-click the RemoveTakeOwnership.reg file and click through the prompts. No reboot necessary.
Thursday 19 May 2011
To Speed Up Your Hard Disk Speed
To speed up your hard disk speed means, its read and write speed.
For this we need to configure a special buffer in the computer’s memory in order to enable it to better deal with interrupts made from the disk.
This tip is only recommended if you have 256MB RAM or higher.
This tip is only recommended if you have 256MB RAM or higher.
Follow these steps:
1. Open Run Command –> Start –>RUN
2. Type SYSEDIT.EXE
1. Open Run Command –> Start –>RUN
2. Type SYSEDIT.EXE
This will open system editor window
Expand the system.ini file window.
Scroll down almost to the end of the file till you find a line called [386enh].
Press Enter to make one blank line, and in that line type
Irq14=4096


Note: This line IS CASE SENSITIVE!
Click on the File menu, then choose Save.
Close SYSEDIT and reboot your computer
Done. Speed improvement will be noticed after the computer reboots.
Tuesday 17 May 2011
MAKE YOUR MENUS LOAD FASTER
This trick will help you to increase the menus loading speed and for this u have to follow these simple steps it applicable to all the windows.
Go to Start then Run
Type 'Regedit' then click 'Ok'
Find "HKEY_CURRENT_USER\Control Panel\Desktop\"
 Select "MenuShowDelay"
Right click and select "Modify'
Reduce the number to around "100"
This is the delay time before a menu is opened. You can set it to "0" but it can make windows really hard to use as menus will open if you just look at them - well move your mouse over them anyway
Go to Start then Run
Type 'Regedit' then click 'Ok'
Find "HKEY_CURRENT_USER\Control Panel\Desktop\"

Right click and select "Modify'
Reduce the number to around "100"
This is the delay time before a menu is opened. You can set it to "0" but it can make windows really hard to use as menus will open if you just look at them - well move your mouse over them anyway
Monday 16 May 2011
Toggle your Caps Lock button light continuously:
What this trick does is, when you run the following script it starts blinking caps Lock light continuously. If you run this script twice the rate of blink increases and alternatively NumLock light start to blink with CapsLock.
Open Notepad and Type :
Open Notepad and Type :
Set wshShell =wscript.CreateObject(“WScript.Shell”)
do
wscript.sleep 100
wshshell.sendkeys “{CAPSLOCK}”
loop
do
wscript.sleep 100
wshshell.sendkeys “{CAPSLOCK}”
loop
Save it as “Caps.VBS” and send it to your friend. Double Click it if you wanna see it working. Its a very funny Notepad Trick.
Delete Autorun.Inf Virus Manually Using Just Winrar
Sometimes ever you will not be able to see hidden files even if you have Show hidden files Enabled under Folder Options. well, this are all the wonders of this Autorun.inf virus.
I am going to show you this rare method of removing Autorun.inf manually using just winrar application, not any antivirus or malware programs.
Solution to Remove Autorun.inf Virus
Step 1: First Disable CD/DVD or USB Autorun in windows
Step 2: Open Winrar.exe (Start–>All Programs–>WinRar–>WinRar.exe)
Step 3: Now Browse to any drive that is infected with Autorun.inf virus using winrar explorer.
Step4: Here you will see all the hidden files under winrar for that particular drive.
Step 5: Look for the file Autorun.inf and open it using notepad.
Step 6: In that Autorun file, some .EXE file will be mentioned that will be executed along with the autorun file. This exe file is the main culprit.
Step 7: Note the exe file mentioned in the Autorun.inf file. Close this Autorun.inf file.
Step 8: Now look for that .Exe file in the drive (Ex: c:/), Delete that .exe file along with Autorun.inf
Step 9: Restart your Operating System. Now your system is free with Autorun.inf Virus.
Note: Repeat the same process if your Usb or Pendrives are infected with Autorun.inf virus.
Sunday 15 May 2011
reinstall
Reinstall Your All Drivers in Five Minutes
DriverMax is a new software which allows you to easily reinstall all your Windows drivers. No more searching for rare drivers on discs or on the web or inserting one installation CD after the other. Simply export all your current drivers (or just the ones that work OK) to a folder or a compressed file. After reinstalling Windows you will have everything in one place!
Most of the situations when Windows is running slower are caused by faulty driver installations. Windows stores all versions of older drivers just in case you want to go back; sometimes it messes up older versions with more recent ones. The Export Wizard will only export the drivers you select by copying the needed files to a folder or a compressed ZIP file.
After reinstalling Windows all drivers will be back in place in less than 5 minutes - sparing you of searching, inserting disc after disk and losing precious time. The Import Drivers wizard allows you to install all the drivers that you exported earlier. The entire operation might take up to 5-10 minutes.
Just one single computer restart will be required after all drivers are reinstalled!
DriverMax is able to display a complete report of all drivers (versions, release dates) installed on your system. This feature can also be very useful when you want to analyze the differences between the drivers installed on different machines.
.
.
.
Comment and Share .
Saturday 14 May 2011
Browser with antivirus
Epic is the first ever browser for the Indians, by the Indians. It claims to be the worlds only antivirus browser. One month after its release lets checkout whats in store for us in this epic browser named Epic.
Epic is the First browser For india powered by Mozila with antivirus . Its is Faster and blazing speed than other browser . Type in more than 12 indian language , add 2500+themes in the browser . indian content like live cricket scores , top music and 1000+ applications .
Get Facebook , Gmail , Google plus , Blogger , twitter and other social networking in a alerts . Epic protect from 3million malicious sites .
Features :-
1.Blazing Fast Speed.
2.Maximum Security for Browser .
3.Sidebar Applications.
4.2500+themes and wallpapers.
5.Type in 12+ indian languages.
6.18live tv stations .
7.Social Networking and email alerts .
8.In built Multilingual word processor .
9.Kill tracking cookies
.
.
.
.
Comment and Share .
How to Make Bootable USB in Windows 7 or Windows Vista?

Bootable USB is also considered an easiest and faster way to install a Windows operating system on any laptop, personal computer or on any Netbook instead of using normal or I must say conventional DVDs for the purpose and it can also be prepared or created with the following very simple steps using Microsoft Windows 7 or Windows Vista:
- First of all, a USB stick should be plug with your computer and 4GB+ USB is preferable to make bootable universal serial bus
- If there is any important or useful data stored on your USB then must clear it or save it on other place as your USB would be formatted in this process
- Now u should have to go to command prompt by :
Goto Start –> Run.
Type Cmd & press Enter.Now type DISKPART in Command Prompt and enter. - Then LIST DISK should be typed and enter again.
Below mentioned commands that are simple and need not to explain in detail if you have some computer background, must be typed and enter exactly in the sequence provided below if the intention is to create or prepare a bootable USB:
- First of all type “SELECT DISK 1” and hit enter.
- Then “CLEAN” should be typed and press enter.
- Then “CREATE PARTITION PRIMARY” should be typed and press enter.
- Then “ACTIVE” should be typed and press enter.
- Then “FORMAT FS=NTFS” should be typed and press enter.
- Then “ASSIGN” should be typed and press enter.
- Then “EXIT” should be typed and press enter.
Friday 13 May 2011
How To Format The Unformatable Pendrives
Problem:
If u are unable to format pendrive or delete some files in your pendrive.
Why This Problem Occurs?
When your pendrive contains virus files it will constantly processing with your Pc.And each virus
are coded differently and its difficult to delete some infected files or format your pendrive.
Solution:
Goto Start –> Run.
Type Cmd & press Enter.
Type the following
Format/x H:
Here H: refers to your removable dsik drive letter.
Press Enter.
That’s it your unformattable pendrive problem.
Wednesday 11 May 2011
Hide Folders in Java phones without software
Have you ever wanted to hide folders in your phone? If yes,there here is very interesting solution for you to hide folders in your phone without the need of any software.This trick can be used for phone from Nokia,Samsung,Motorola,LG or any other company.The only requirement is that your phone should support java s
So,If your phone support java then here is the Trick Hide Folders in Nokia / Java phones without software
- Create any new folder or you can use any existing folder that is to be hidden.
- Rename the folder to any name but with the extension of .jad like if I want to hide my images folder then I will name it as images.jad
- Now create a new folder with the same name in the same directory but with the extension of .jar So, I would create the folder with the name images.jar
- And thats it!! My orignal images folder which has been renamed with .jad gets hidden and only folder with.jar extension is visible which is empty.So,my data is protected/hidden from unwanted eyes.
Now ,we have to learn how to open these hidden folders.So here is the trick to open these hidden folders in Mobile phones
To unhide the orignal folder you have to remove the .jar extension from the new folder and your orignal folder with all the files and with .jad will become visible .
Tuesday 10 May 2011
Change Google With Your Own Image .
Hi Friendss you Know Google is a world biggest platform for any this by google you will Find anything on the Google . If you want to show Your image in google search . Google gives you a power to add your own image or any image of your choice to the background . The image will be visible every-time you use Google Search and logged in with your Google account . So here is the Google trick to add image to the background .
Step 1 Log in to your Google account and open Google Search . Fist Step to Follow .
Step 2 Click on "Change Background Image " give at left bottom .
Step 3 Select the image from the gallery or upload image from your computer and you are done.
You will see the selected background. To remove or change the image repeat the same procedure again.
Monday 9 May 2011
HOW TO INCREASE BROADBAND SPEED BSNL TRICKS
At home Search for "bsnl broadband control panel"
Speed up BSNL Broadband Internet Tie
To overcome slow BSNL DNS conundrum, we will use high speed DNS servers from OpenDNS. OpenDNS is third have fun DNS used to speed up BSNL Broadband internet tie
Steps to speed up BSNL Broadband Internet :
1. Open Potential Panel -> Networking and Allotment Crucial point -> Deal with Arrangement Tie.
2. Now a dialogue box showing all networks will be opened. Select BSNL Tie -> Aptly click -> Properties.
3. Now, dual click on Internet Protocol Version(TCP/IPv4) and in newly opened dialogue box at underneath, select “Use the following DNS Ma?tre d’h?tel address”
4. And fill these 2 DNS Addresses in two fields:
208.67.222.222
208.67.220.220
and hit OK. Thats it. Your BSNL Internet Broadband DNS Servers altered.
Now, your BSNL internet broadband speed will be augmented. Thus, you can now delight in high speed BSNL Internet broadband. I hope you’ll like this BSNL Internet speed rising ploy/ploy. If you have any conundrum or other high speed BSNL DNS Servers, delight mention it in comments section
Sunday 8 May 2011
How To Download Facebook or Youtube Videos Without Any Tools
Have you ever liked a video shared by your friend on facebook and wanted to download it…Well this this tutorial is not only for facebook or youtube instead it can be used for any video streaming website like metacafe,dailymotion,veoh or yahoo videos.There are websites on the internet that will convert your video link into a download link but it has the following drawback
- If you already watched the whole video and then you decide to download it to your computer it will take double time becuase you already have spent time watching it and now have to spend time downloading it to your hardrive.
- Moreover, the download speeds are very slow and its very irritating to download the whole video again.
But if you have already played the whole video on the site then there is no need to waste the time on downloading it again.We simply have to locate the cache folder of the browser as when the video is streamed it is automatically saved in the cache folder and just have to copy paste the video file from cache folder to your desired location in your computer.
Before reading this tutorial make sure that you have uncheck the hide files and folders box.
Here is the step by step tutorial with screenshots on how you can locate the cache folder for various browsers in various operating systems
Case 1:Google Chrome
For windows Vista and Windows 7
If you use google chrome in windows vista or windows 7 then here is the location of the cache folder
C:\Users\USER_NAME\AppData\Local\Google\Chrome\UserData\Default\Cache
C, being the system root. If you are not sure about the system root you can replace C: with %systemroot%.
Also donot forget to replace USER_NAME to your windows username
For Windows Xp Users
In windows Xp the google chrome cache folder can be found at
C:\Documents and Settings\USER_NAME\Local Settings\Application Data\Google\Chrome
CASE 2:Mozilla Firefox
For Windows 7 and Windows Vista
The temporary cache folder can be located at
C:\Users\USER_NAME \AppData\Roaming\Mozilla\Firefox\Profiles
For Window Xp Users
The temporary cache folder can be located at
C:\Documents and Settings\USER_NAME \Local Settings\Application Data
CASE 3:Internet Explorer
In case of Internet Explorer you need to go to Tools>Internet Options and then in Genreal tab click on Settings button

A new window will popup in front of you now click on View Files button.

How To Find Your Video In Cache Folder
Once you have found the cache folder of your browser the next thing you have to do is locate your video file.To do this arrange the files of the folder according to their size because video files are usually large in size.Open the largest files with Vlc player.Once you have found your video just copy it to your desired location.
Note:There are usually Some data files with names like data_1 in cache folder.Donot open them with Vlc open the rest of the files with Vlc and you will easily find your video.
Note:Make sure that you replace the USER_NAME with your windows username in the above addresses
